-
Nov 26, 2025
TIL - gitsha with dirty
Nov 26git describe --always --dirty --match=''This command return the gitsha of HEAD, in short form, and attaches
-dirtysuffix if there is change in tracked files.7e68a98,7e68a98-dirty. Staged files is also considered as dirty.The
--match=""avoid matching to any nearby git tags, and always return the gitsha.This is helpful sometime in build system for tracking application version.
-
Apr 6, 2025
Cortext M chip reset behaviour
Apr 6Upon power-on reset, the Cortex-M processor’s initial actions involve accessing the vector table • The core first reads the initial Stack Pointer (SP) from the first entry of the vector table (at address 0x00000000) • Then, the core reads the start Program Counter (PC), which is the reset vector, from the second entry of the vector table (at address 0x00000004) The Link Register (LR) is also set to 0xFFFFFFFF • Execution then begins at the address pointed to by the reset vector.
While the vector table is initially at 0x00000000, its location can be changed by writing to the Vector Table Offset Register (VTOR). This allows for relocating the vector table to a different memory location, such as SRAM, for performance optimization or to enable dynamic changes. When setting the offset in the VTOR, the table base must be aligned based on the number of exceptions supported, with a minimum alignment of 32 words (128 bytes) for up to 16 interrupts. For a larger number of interrupts, the alignment must be to the next power of two in terms of the number of words required.

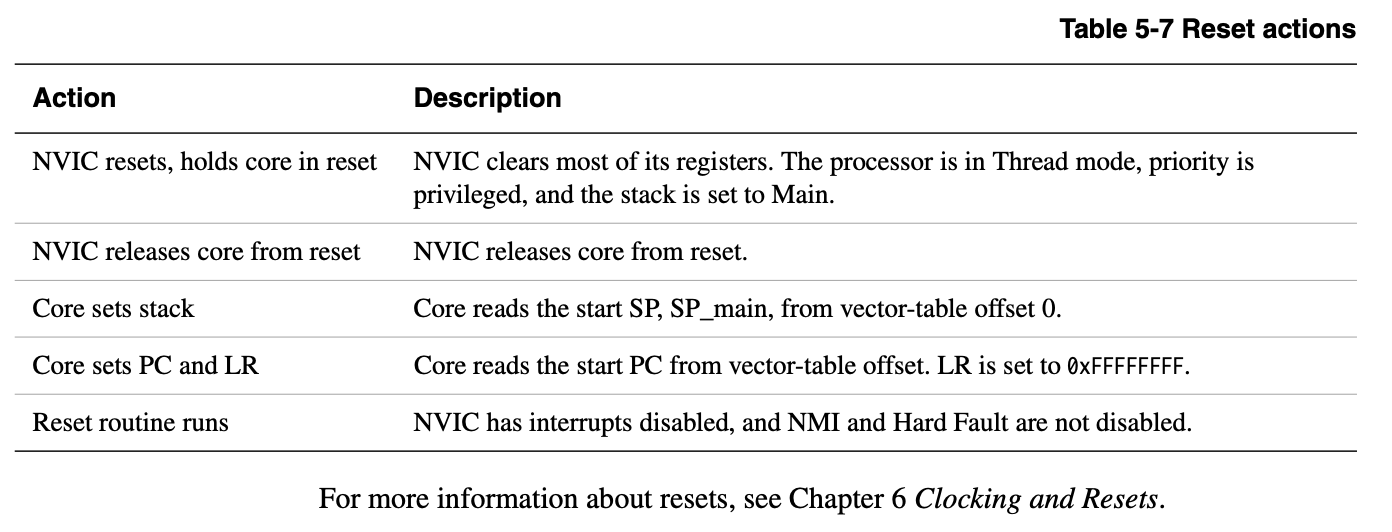 ddi0337e_cortex_m3_r1p1_trm (Section 5.9 Resets)
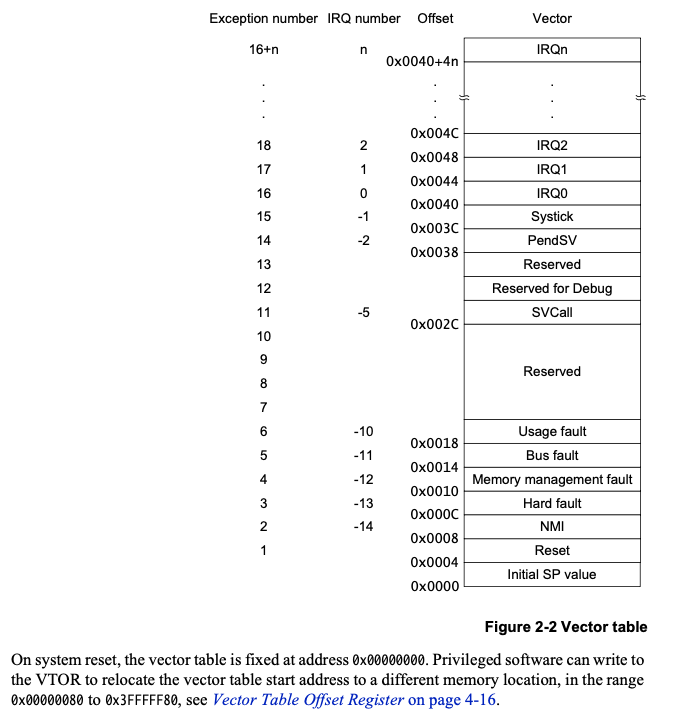 DUI0553.pdf (Section 2.3.4 Vector Table)
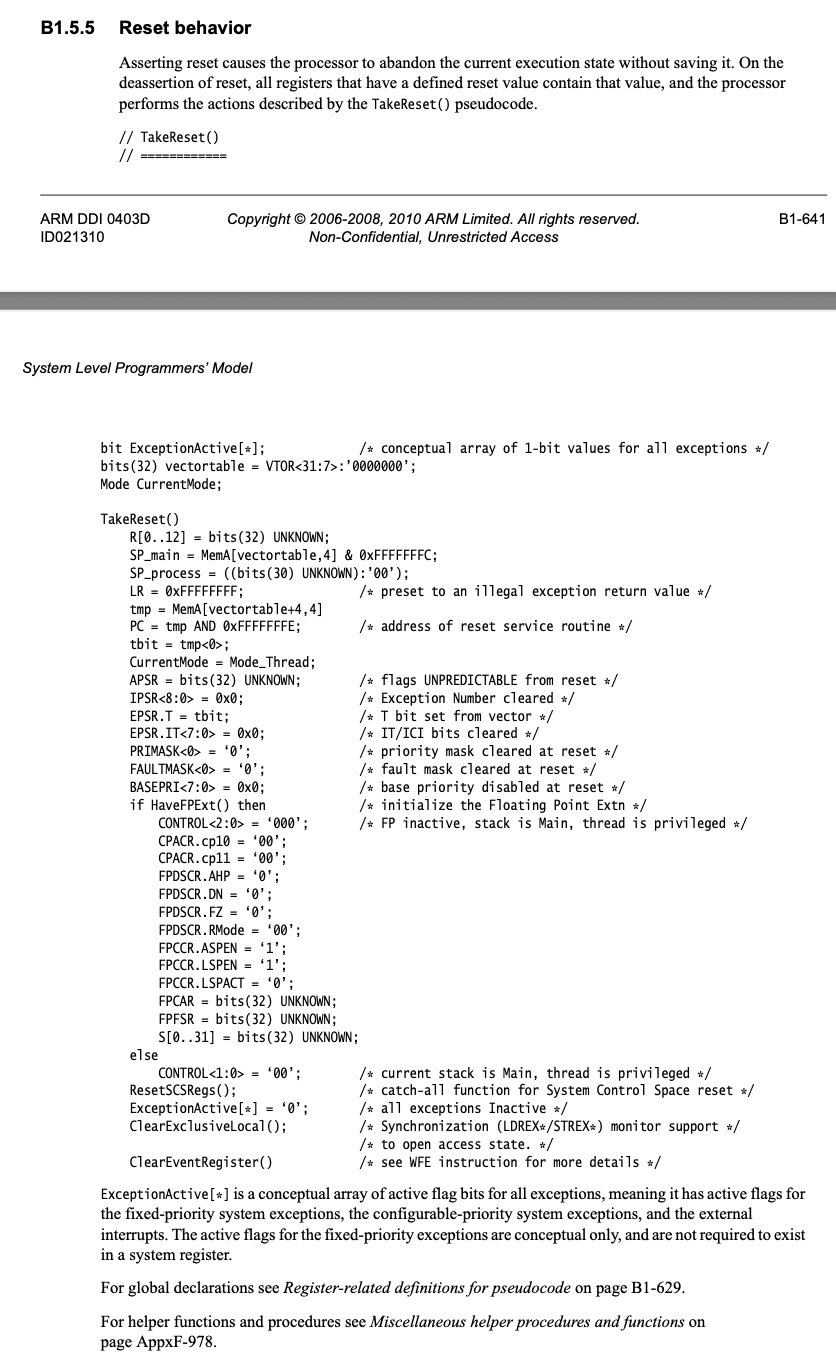 DDI0403D_arm_architecture_v7m_reference_manual (Section B1.5.5 Reset behaviour)
One special thing with vector table is that, the final compiled vector handler addresses are not power of two. This is because the bit[0] of these reset handlers are used for setting the
EPSR.Tbit on exception handlings. DDI0403D_arm_architecture_v7m_reference_manual (Section B1.5.3 Vector table)
This kind of bring up the question what is the ESPR register?
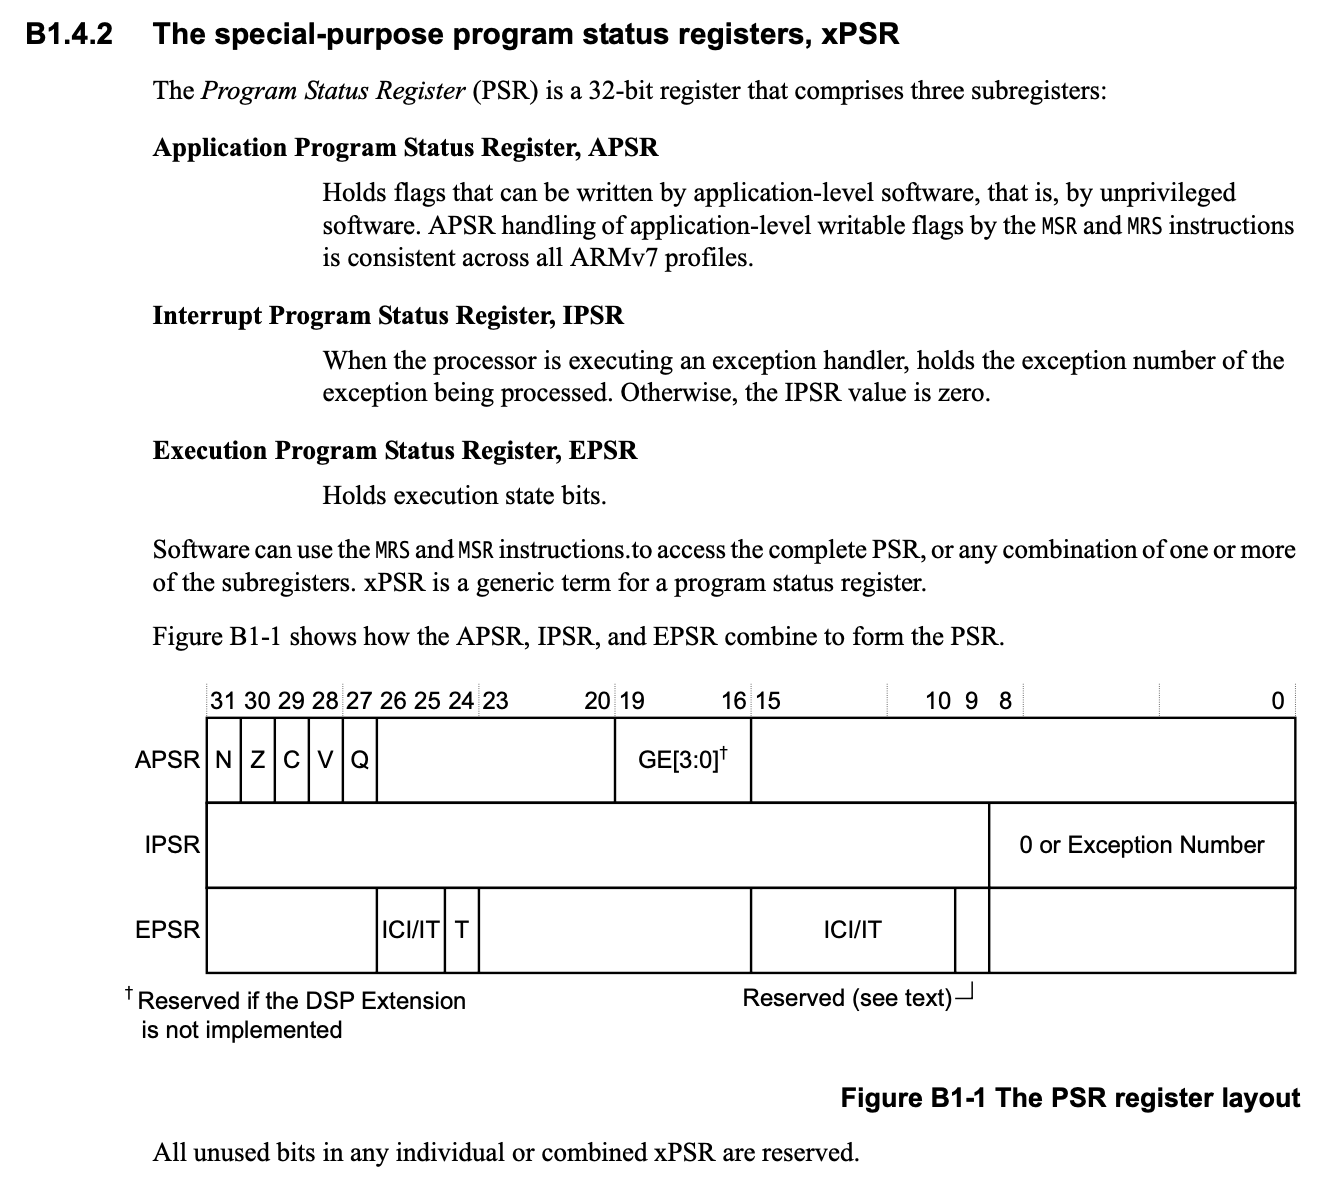
Okay so it is the thumb state, but why does the reset need to enable thumb instructions.
 DDI0403D_arm_architecture_v7m_reference_manual (Section B1.4.2 The special-purpose program status registers, xPSR)
Okay, this is actually news to me!
-
Mar 10, 2025
Goose on weekend side projects
Mar 10I spent some of my limited spare time between childcare duties working on a project: creating llvm-binary-releases using Goose. The goal was straightforward: take an LLVM release package, extract the specific clang tool binary I needed, and produce a new platform/OS-specific release. I planned to set up a hermit package for clang-format because finding pre-built clang binaries is surprisingly difficult. While native package managers are available, they tend to complicate dependency management in build systems, so I decided to solve the problem myself.
Starting with Goose was simple. I asked it to generate a script to download a tarball from a given URL and extract the required binary. It produced about a 100-line bash script that worked well for a task confined to a single source file. However, when I moved on to more complex tasks—such as incorporating bash functions—issues began to appear. Instead of returning proper error codes, Goose used echo to return strings, which caused problems when other parts of the program attempted to use these values. It seemed that Goose had difficulty adhering to the API contracts it had designed. I wondered how other AI tools would handle this situation, but I managed to resolve the problem by asking Goose to rewrite the code in Python. The Python version maintained the API contracts properly.
Next, I requested that Goose create a GitHub workflow to handle the output from the Python script. This task proved challenging. After several rounds of error reports and fixes, Goose made some adjustments, but the changes were sometimes suboptimal, and it often failed to interpret the error messages correctly. In the end, I fixed the issue myself—it turned out to be a one-line problem after I reviewed the documentation.
Overall, the project took about three hours over the weekend, even with interruptions from childcare. Although the final product isn’t perfect, I’m satisfied with the result considering the time and effort involved. In previous experiences, similar projects might have required 3-4 hours of focused work, and I might have abandoned the project when faced with obstacles. For me, using LLMs has proven valuable in jumpstarting and completing these side projects, automating tedious tasks and even producing solid documentation.
Now, I’ll copy this draft into another LLM for a final polish.
PS: I copied this draft into the chatgpt for polishing, and did NOT add the “another LLM” part, just the line of copying this into LLM. And chatgpt recognized Goose as a different LLM and differentiated itself. Anyways just thought it was an interesting detail.
-
Feb 28, 2025
Dev notes from Feb 2025
Feb 28Git performance tracing
I noticed that some git commands, especially
git status, were taking a long time to execute. Since it’s tied to my command prompt, this also slowed down my prompt. By usingGIT_TRACE=1, I could see what git was doing. The issue was that the repository had too many submodules, causinggit statusto run on each one, which took time.$ GIT_TRACE=1 git status 14:40:25.548035 git.c:476 trace: built-in: git status 14:40:25.550695 run-command.c:667 trace: run_command: cd themes/hello-friend-ng; unset GIT_PREFIX; GIT_DIR=.git git status --porcelain=2 14:40:25.550763 run-command.c:759 trace: start_command: /opt/homebrew/opt/git/libexec/git-core/git status --porcelain=2 14:40:25.557470 git.c:476 trace: built-in: git status --porcelain=2 On branch main Your branch is up to date with 'origin/main'. 14:40:25.567125 run-command.c:667 trace: run_command: GIT_INDEX_FILE=.git/index git submodule summary --cached --for-status --summary-limit -1 HEAD 14:40:25.567200 run-command.c:759 trace: start_command: /opt/homebrew/opt/git/libexec/git-core/git submodule summary --cached --for-status --summary-limit -1 HEAD 14:40:25.573148 git.c:769 trace: exec: git-submodule summary --cached --for-status --summary-limit -1 HEAD ...Fish shell performance tracing
Similarly, the fish shell has a profiling feature:
       -p or --profile=PROFILE_FILE
              when fish exits, output timing information on all executed commands to the specified file.  This excludes time spent starting up and reading the configuration.

       --profile-startup=PROFILE_FILE
              Will write timing for fish startup to specified file.
The profile file looks like this:
Time    Sum     Command
115     10404135        > __fish_print_help fish
435     437     -> source /opt/homebrew/Cellar/fish/4.0.0/share/fish/functions/__fish_print_help.fish
2       2       --> function __fish_print_help --description "Print help message for the specified fish function or builtin" --argument-names item error_message...
2       2       -> switch $item...
1       21      -> if not test -e "$__fish_data_dir/man/man1/$item.1" -o -e "$__fish_data_dir/man/man1/$item.1.gz"...
20      20      --> not test -e "$__fish_data_dir/man/man1/$item.1" -o -e "$__fish_data_dir/man/man1/$item.1.gz"
2       2       -> set -l help
1       1       -> set -l format
0       0       -> set -l cols
1       72      -> if test -n "$COLUMNS"...
-
Apr 6, 2024
Trigger DFU via USB on nRF52840 Dongle
Apr 6The NRF5280 dongle is a great embedded development platform, especially for hobbyist project or quick prototyping. There is also a very similar product from Make Diary with slightly different PCBA layout. It is generally a decent utility tool for BLE related work. These functionality can all be done out of box with the nrf desktop tool without doing any programming.
There are plenty of blog post on this already that covers introductory programming with the nordic part. But one interesting feature that I run into while working with this dongle was how to trigger DFU programming quickly.
The nRF52840 dongle support DFU programming via it’s bootloader, where one can use
nrfutilprogram the hardware. The dongle can be reboot into DFU mode via the side reset button. The dongle’s red LED goes into this slow glow effect, and the usb device is re-enumerated as
ID 1915:521f Nordic Semiconductor ASA Open DFU BootloaderAll this mean the dongle is ready for DFU programming now!Now you can a command like to issue the programming:
$ nrfutil device program --firmware dfu_package.zip --traits nordicDfuIn addition you can create the
dfu_package.zipfile with:$ nrfutil nrf5sdk-tools pkg generate --hw-version 52 --sd-req=0x00 --application application.zip --application-version 1 dfu_package.zipThis flow works great for 90% of development flows. You will need to be careful not to accidentally erase the UICR region, or else the bootloader will no longer boot into DFU. I learned this the hardware. If you do end up get the hardware into a state where bootloader don’t enter DFU mode, you will need to get a jtag programmer and connect the jtag pins to the dongle to programming the old fashion way.
But these are not what I want to focus on here, I want to focus on how to trigger the DFU mode to begin with.
I am a lazy person, the idea of having to manually press a button on the hardware to start FW programming is just very tiresome to me. Not to mention doing this tens or hundreds times a day.
Triggering DFU mode via USB
Essentially on the nRF52840 dongle, just setting the reset pins cause the MCU to reboot into bootloader and bootloader code detect that reset pin are set and enter into DFU mode.
nrf_gpio_cfg_output(BSP_SELF_PINRESET_PIN);
nrf_gpio_pin_clear(BSP_SELF_PINRESET_PIN);
The hard part is somehow getting a signal from the host machine to the target device to reset the pin.
But luckily this is all reasonably documented! In addition there is a official standard for this, Nordic implementation isn’t fully compliant but it’s close enough. The nrfsdk provide this helpful component anyone can simply include in their FW, some configuration with
sdk_config.his required, as with everything in nrfsdk.If setup correct it should show up as new vendor interface similar to.
DEVICE ID 05ac:0256 on Bus 000 Address 007 =================
...
  CONFIGURATION 1: 100 mA ==================================
  ...
    INTERFACE 0: Vendor Specific ===========================
     bLength            :    0x9 (9 bytes)
     bDescriptorType    :    0x4 Interface
     bInterfaceNumber   :    0x0
     bAlternateSetting  :    0x0
     bNumEndpoints      :    0x0
     bInterfaceClass    :   0xff Vendor Specific
     bInterfaceSubClass :    0x1
     bInterfaceProtocol :    0x1
     iInterface         :    0x0
Therefore by setting up a control transfer to the usb device like below, it should in theory trigger the dongle to reboot in DFU mode.
libusb1_backend = usb.backend.libusb1.get_backend(
    find_library=lambda x: "/opt/homebrew/lib/libusb-1.0.0.dylib"
)

dev = usb.core.find(idVendor=0x1915, idProduct=0x521f, backend=libusb1_backend)

bmRequestType = usb.util.build_request_type(
    usb.util.CTRL_OUT, usb.util.CTRL_TYPE_CLASS, usb.util.CTRL_RECIPIENT_DEVICE
)

try:
    dev.ctrl_transfer(bmRequestType, 0x00, timeout=1)
except usb.core.USBError:
    pass
If you noticed the dongle rebooting but not entering DFU, it’s likely resetting or crashing somewhere before the reset pin is set. Just check the code path to
dfu_trigger_evt_handler()incomponents/libraries/bootloader/dfu/nrf_dfu_trigger_usb.cfunction free of other issue. For example I had used the log backend, but didn’t set it up correctly and it was causing the dongle to crash onNRF_LOG_FINAL_FLUSH()right before the reset pin is set.